Tile flooring transforms a space with durability and style, but plenty of DIYers avoid the project thinking it requires professional skill. The truth? Laying tile is learnable, manageable, and deeply rewarding when you respect the process. Success hinges on three things: solid subfloor prep, proper tools, and patience with the details, especially thinset consistency and grout curing time. Whether you’re refreshing a bathroom, kitchen, or entryway, this guide walks you through the essentials so your finished floor stays flat, level, and beautiful for years.
Table of Contents
ToggleKey Takeaways
- Tile flooring installation success depends on three critical factors: proper subfloor preparation, the right tools, and patience with thinset consistency and grout curing times.
- A subfloor must be level within 1/4″ over 10 feet to prevent lippage, cracked grout, and water pooling—check with a straightedge and use self-leveling compound or cement backer board to correct issues.
- Always use thinset mortar (not mastic) for floor tile applications, apply it at a 45° angle with consistent ridges, and allow 24 hours cure time before grouting to avoid shifting tiles.
- Dry-lay tiles from the center of the room outward to prevent awkward slivers at walls, and use spacers consistently to maintain uniform grout joint widths of 1/4″ for large tiles and 1/8″ for smaller ones.
- Grout must be mixed to cake-batter consistency and packed diagonally into joints, then wiped after 15–20 minutes; avoid foot traffic for 72 hours and reseal grout every 1–2 years to protect against stains and water damage.
- Wear safety gear including a dust mask and eye protection throughout tile flooring installation, as a wet saw throws tile chips and grout dust requires respiratory protection.
Tools and Materials You’ll Need
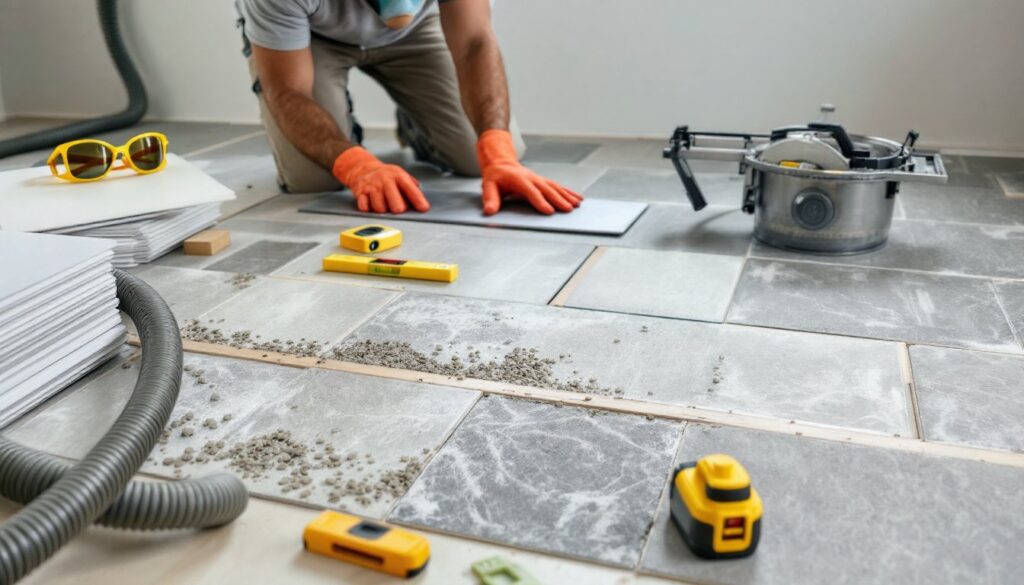
Before ordering tile, gather your arsenal. You’ll need a wet saw (essential for straight, clean cuts, a handheld angle grinder creates too much dust and chipping), a notched trowel (the size depends on tile size: use 1/4″ × 3/8″ for small tiles, 1/2″ × 1/2″ for larger ones), a grout float, and a mixing paddle for your drill. A laser level or straightedge beats guessing on flatness, and a tile spacer set keeps grout lines consistent.
Material checklist:
• Ceramic or porcelain tile (porcelain is denser, more stain-resistant, and better for wet areas: ceramic is lighter on the wallet for low-traffic spots)
• Thinset mortar (not mastic, mastic fails on floors over time)
• Grout (sanded for joints over 1/8″, unsanded for smaller joints)
• Grout sealer (skip this only on porcelain: natural stone and unglazed ceramic need it)
• Cement backer board for wet areas like showers (use screws, never nails)
• Underlayment or self-leveling compound if your subfloor has minor dips
Safety gear: Wear dust mask or respirator, safety glasses, and work gloves. A wet saw throws tile chips: eye protection is non-negotiable. Keep a broom and shop vacuum running, wet grout dust becomes concrete-like concrete when airborne.
Preparing Your Subfloor and Layout
Assessing and Leveling Your Substrate
Tile doesn’t forgive a wavy subfloor. A floor that’s out of level by more than 1/4″ over 10 feet will cause lippage (uneven tile heights), cracked grout, and water pooling in bathrooms. Check with a 6- or 10-foot straightedge: pivot it around the room and note low spots.
If the subfloor is wood, ensure it’s structurally sound, bounce test it, and listen for flex. Soft spots mean rot or damaged joists, which must be repaired before tile goes down. Nail down squeaky sections or add screws in a grid pattern (16″ on center) to stiffen the floor. Hardwood is too flexible for tile: cover it with 1/4″ cement backer board screwed down every 8″ to create a stable base.
For concrete subfloors, grind down high spots and fill low spots with self-leveling concrete. Most suppliers recommend a minimum 48-hour cure before thinset application. Check your local building code, some jurisdictions require an isolation membrane for concrete slabs to prevent moisture migration and cracking.
Planning Your Tile Pattern and Spacing
Lay out your tile dry (no mortar) from the center of the room outward. This prevents awkward slivers at walls. Find the midpoint of your longest dimension, snap a chalk line, and dry-lay a row. If your last tiles are thinner than a half-tile, shift your center line half a tile width and re-lay. This small adjustment saves you from cutting dozens of slivers.
Consider your grout joint width. Larger tiles (12″ and up) typically use 1/4″ joints for a clean look: smaller tiles (4–8″) work well at 1/8″. Use spacers consistently, they’re cheap insurance against eyeballing it. Mark reference lines with chalk: they’ll wash off after grouting. Work in small sections (about 3–4 square feet) so your thinset doesn’t skin over before tile is seated.
Setting Tile and Grouting
Mixing thinset: Add powder to water (not the reverse), using a stiff paddle and your drill on low speed, high speed whips air into the mix, creating voids. Aim for peanut butter consistency: too watery and your tile slides, too thick and it won’t bond. Let it slake (rest) for 5 minutes, then remix briefly.
Apply thinset with the flat side of your notched trowel at a 45° angle, covering about 3 feet of your reference line. Use firm pressure so ridges are consistent, the tile should collapse these ridges and create a thin, complete bond line underneath. Press each tile with a slight twist, and use spacers immediately. Check every third tile with a level: lippage multiplies fast.
Let thinset cure per manufacturer specs, usually 24 hours, before grouting. Don’t skip this: walking on soft thinset shifts tiles and ruins your layout.
Grouting: Mix grout to cake-batter consistency and push it diagonally across tile faces with your grout float, packing joints fully. After 15–20 minutes (when grout firms up), hold the float nearly vertical and wipe diagonally again, this time removing excess. Wipe your grout float frequently on a wet sponge. Most grout hardens in 24–48 hours: non-sanded grout sets faster. Avoid foot traffic and water for at least 72 hours, then apply grout sealer if the grout isn’t pre-sealed.
Finishing Touches and Maintenance
Once your grout has cured, install trim and baseboards. If you’re matching existing trim, sand and paint or stain new pieces to blend seamlessly. Bullnose or trim tile at thresholds protects the edges from chipping and looks intentional.
For long-term durability, seal grout (especially in kitchens and baths) every 1–2 years, water and stains are the main enemies. Resealing is cheap prevention. Clean regularly with pH-neutral cleaner: acidic cleaners etch grout, and bleach-based products wear sealers. Wipe spills promptly, especially wine, oil, and acidic foods on natural stone.
If cracks appear in grout within the first few weeks, don’t panic, minor shrinkage is normal. Deeper cracks or lippage after a month signal a prep problem. Cost estimates for professional tile vary widely by region and material grade: resources like HomeAdvisor help you benchmark local labor if you decide to hire out. For design inspiration and contractor recommendations, Houzz is a solid starting point. If you’re curious about alternative floor coverings, This Old House’s linoleum installation guide covers a different substrate approach worth comparing.